You store tons of data on your system. It may include files & folders and a lot other data types. With increasing cyber threats and threats that arise due to curious onlookers, it becomes important to keep your data secure. To do this, you can follow certain steps on your PC such as password protect files in Windows 10 or using third-party tools to do that. The available ways are numerous that you can follow. Let’s discuss how to password protect files and why it is necessary?
Why you should protect your files?
As we have mentioned cyber threats and threats arisen from curious onlookers are two top most concerns you should be worried about. According to recent stats, in the first three quarters of 2019 has seen 7.2 Billion malware attacks and 151.9 million Ransomware attacks worldwide. While the stats are staggering, the concerns are genuine with people.
Now with each malware attack the target is your data. Thus, it becomes crucial to keep your data protected against ever increasing malware threats. Even the facts related to ransomware attacks are astonishing as there is parallel industry working on dark web with millions of dollars in revenue generated through online ransom. You Must Use the best antivirus software which will be easy for you to protect from these attacks.
How to password protect files?
Use built-in feature
Windows offers feature or utility built-in to perform almost any task on your PC. It not only helps you clean, optimize, and secure your PC, but you can also use these built-in features to perform similar other tasks. Here, you get a built-in feature that locks out other people from accessing your important files without password. To use this feature and protect your files with password, follow below mentioned steps:
- Go to File Explorer.
- Here, select file or folder that you want to password protect.
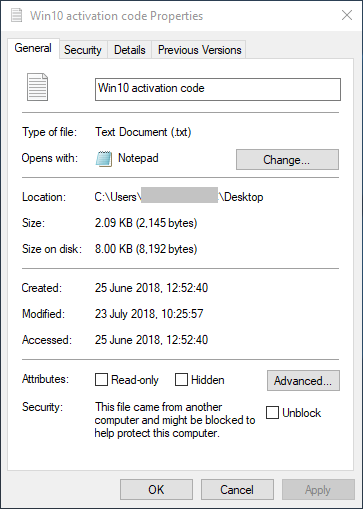
- Once you have selected it, right-click on it and select Properties.
- Now under General tab, click on Advanced button next to Attributes option.
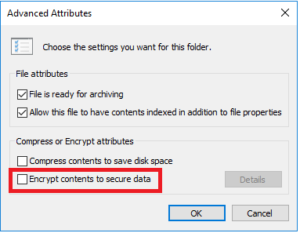
- Tick ‘Encrypt contents to secure data’ option and press OK.
- Now on Properties window, again click OK.
- Now it will ask you to select from ‘Encrypt the file and its parent folder (recommended)’ or ‘Encrypt the file only’ option.
- Select one of these options as required and press OK.
Now it will ask you to back up your file encryption certificate and key on pop-up window. Follow the on-screen instructions to complete the process.
Use third-party app
You can find numerous apps on the market that helps you password protect your files & folders. One such app is WinRAR that not only helps you compress/archive your data, but it also helps you password protect your files in a jiffy. Alternatively, you can also use WinZip to archive and set password to the archived folder. To password protect files & folders using WinRAR, follow below mentioned steps:
- Go to official website and download and install WinRAR. Here, you will find multiple language options to select from. Pick one as per your requirement.
- Now open file explorer and select the file or folder that you want to password protect.
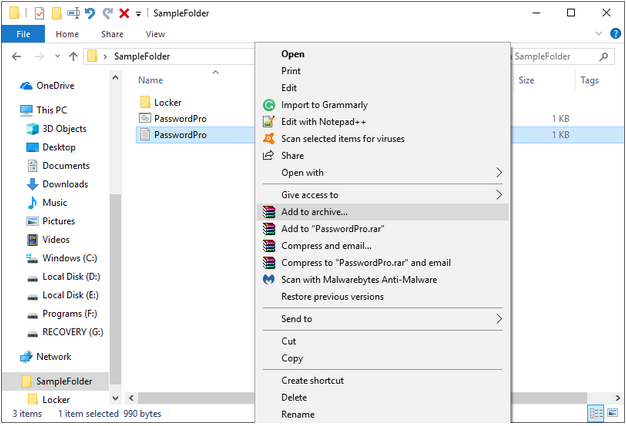
- Once selected, right-click on it and select ‘Add to archive’ option.
- Give this file a Name and click on ‘Set password’ button.
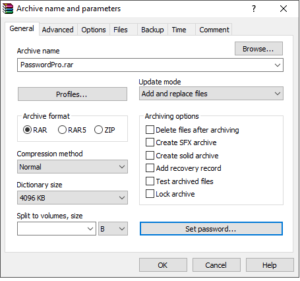
- Enter the password when prompted.
- Make sure to check he option ‘Encrypt file names’.
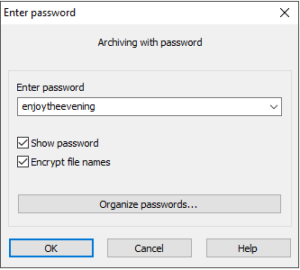
- Click on OK and then OK again to complete the process.
You’re done.
Conclusion
Password protecting file or folder could be really easy when you follow the above mentioned steps. It not only ensures your data security, but it also ensures quick access to your data when needed. Do follow these steps to protect your data with password and don’t forget to share your experience in the comments below.


